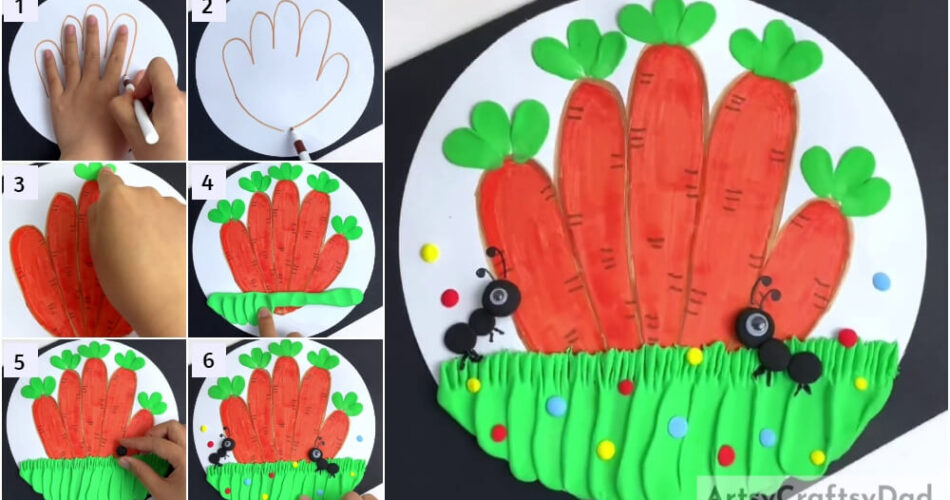
This step-by-step tutorial will help you to create an easy carrot drawing craft with colorful clay & hand outline, which is perfect for kids.
Welcome to this hand-outline carrot drawing and clay craft tutorial! Here, we are going to learn how to create carrot drawings and clay crafts using simple steps. This detailed tutorial is appropriate for kids and adults. To create this craft you will need some easily available craft materials, like craft paper, color markers, and clay. Let’s start!
Carrot Drawing And Clay Craft For Kids Using Hand Outline
Must Read: Easy Craft Ideas from clay/Plasticine for Easter
Materials Required
- White Craft Paper
- Colored Markers (Orange And Brown)
- Colored Clay (Black, Green, Red, Yellow, And Blue)
- Googly Eyes
- Clay Shaping Tool
Carrot Drawing Instructions
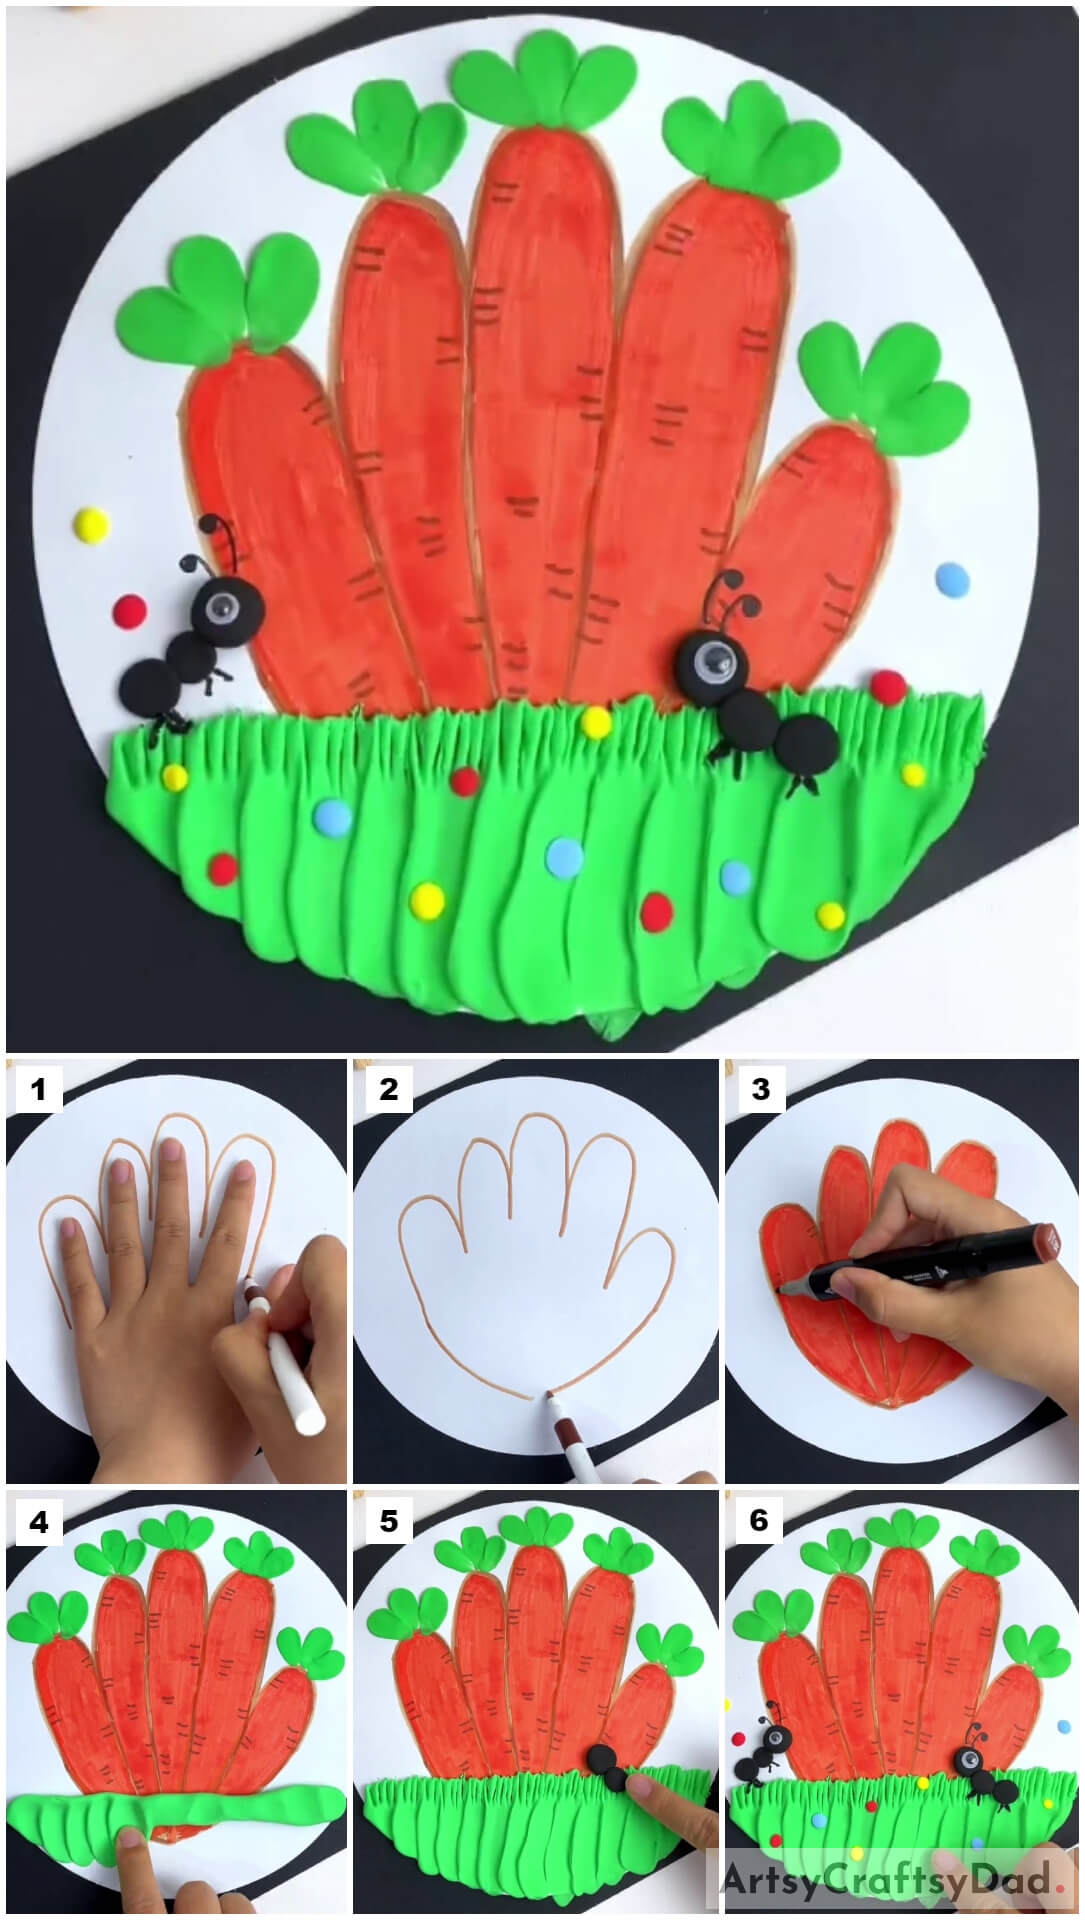
Step #1: Outlining The Hand Using Brown Marker

Cut your white craft paper into a circle shape to make the base for your craft, then open your left hand and place it on the center of your paper. Draw an outline of your four fingers using a brown marker till the finger ends.
Step #2: Connecting Outline Ends

Now, connect both lines ends with a brown marker as shown in the sample image.
Step #3: Making Carrots

Now, connect the finger’s lines to the end of the figure in the middle to form individual carrots of them. Color your carrots with an orange color marker and also draw two to three small parallel lines on carrots using the brown marker to detail them.
Step #4: Creating Leaves

Take small 3 pieces of green color clay and roll them into an oval shape. Then place those pieces on top of the carrot as shown and slowly press all pieces to flatten them.
Step #5: Making Leaves On All Carrots And Making A Green Clay Roll

Create 12 oval shapes from green clay pieces and as before stick three pieces of green clay for each carrot. Now, dough the green clay into a long and thick roll and place it at the bottom of the carrots as shown in the image.
Step #6: Making The Ground

Using your finger, press and drag down your clay roll to the bottom of the base one by one to form the ground beneath the carrots.
Step #7: Creating Grass

Using a clay shaping tool, carve the top side of the ground into small lines to make the grass.
Step #8: Pasting Black Clay Roll

Take black clay, then roll it into 3 clay balls. Place one clay ball above your grass on the right side as shown in the image.
Step #9: Making Ant’s Body

Paste the other 2 clay balls below the already placed one a little right to it, making a chain. Press to flatten them and form an ant’s body.
Step #10: Pasting Googly Eye

Stick a googly eye over the head of the ant and press it over the clay.
Step #11: Making Another Ant And Detailing

Make another ant’s body with an eye on the right side of the base and using a black marker, make the v-shaped legs beneath thier bodies and 2-2 curved antennas above the face as shown in the image.
Now, take yellow, blue, and red clay make tiny clay balls, and place them randomly over the craft, except on the carrots. Press to flatten them to add more detailing to your craft.
Yeah! Your Hand-Outline Carrot Drawing And Clay Craft Is Ready!

That’s all, we have completed our hand outline carrot and clay craft. Using our detailed tutorial, you can create this craft effortlessly. This easy craft idea is perfect for all-age kids.
We hope you like this easy clay craft tutorial, Share your thoughts about our tutorial in the comment section below. Don’t forget to visit another project on our website.
Thank you for visiting our website.
You May Also Like
- Clay Snails On Leaves Craft Tutorial For Kids
- Clay-Paper Sunflower Garden Craft Tutorial
- Clay Heart Leaf Tree Craft Tutorial For Kids
- Clay Chicks In Garden Craft Tutorial
- Easy Town Landscape Drawing Tutorial For Kids


