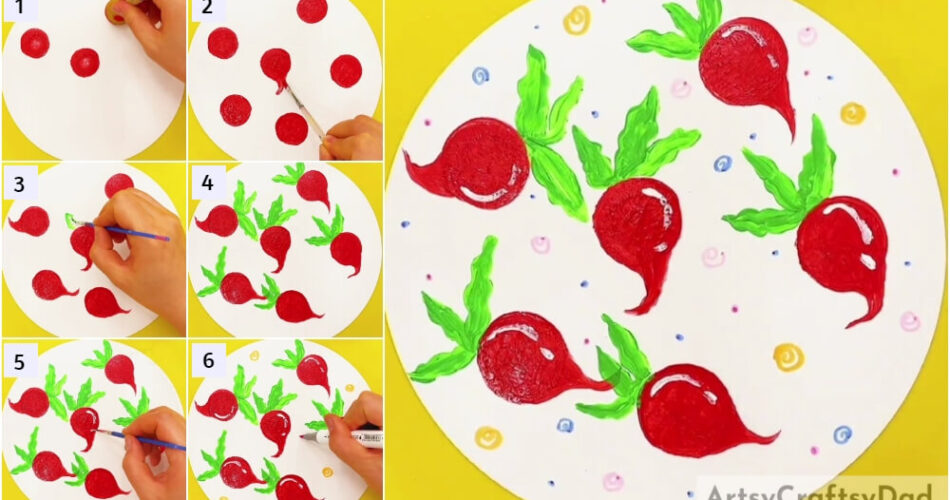
Get your kiddos to eat up the healthy veggies on their plate by getting creative! Make this turnip stamp painting to get the results!
Art can do everything! Don’t believe me? Get your kids involved in making these turnips in a painting and see your kiddos getting interested in those turnips, they previously showed tantrums eating in! You can also make your kiddos learn about the benefits of eating turnips while making this painting! This is a fun learning time pass for your little ones in the boring afternoon hours and develop those motor skills as well! So, let’s grab the listed supplies and begin!
Beautiful Turnip Stamp Painting For Beginners

Must Read: Colorful Snails Paper Craft Tutorial For Beginners
Supplies & Tools
- White Circular Paper Sheet
- Circle Stamp
- Paint Colors (Red, Green, And White)
- Sketch Pens (Pink, Blue, And Yellow)
- Paintbrush
Turnip Stamp Craft Instructions
Step #1: Stamping Red Circles

Begin this craft by taking a white circular paper sheet as the base for the painting and a circle stamp. Dip the circle stamp into red paint and dab it over the base randomly to stamp red circles.
Step #2: Completing Stamping Red Circles

Using the red-painted circle stamp, stamp more and more red circles over the base at a certain distance randomly over the base. See the image for reference.
Step #3: Giving A Turnip Shape

Dip a paintbrush into red paint and make a thin curved part out of the circle to give it a turnip shape. See the image for reference.
Step #4: Making All The Turnips

As you converted the circle into a turnip previously, make the turnips of all the circles, in the same way, as before.
Step #5: Making Leaf Over The Turnip

Dip the paintbrush into green paint and make a wavy and thin leaf of the turnip over it on the base.
Step #6: Making All The Leaves Over The Turnip

Using the same green-painted paintbrush, make 2 more thin and wavy leaves to the turnip from the same point. See the image for reference.
Step #7: Making Leaves To All The Turnips

Make the set of 3 leaves over each and every turnip as you made previously.
Step #8: Adding Shine To A Turnip

Dip the paintbrush into white paint and make a thin curved stroke along the boundary of the turnip and a small dot-like stroke below the long stroke to add shine to your fresh turnip.
Step #9: Adding Shine To All The Turnips

As you did previously, add shine to all the turnips but make sure to ass shine from a specific direction as shown in the image.
Step #10: Making Spirals On The Base

Using a pink and yellow sketch pen, make small spirals randomly over the white base.
This Is The Final Look Of Your Fresh Turnips!

For the last step, make the tiny spirals using a blue sketch pen too, and make dots over the base randomly using the pink, yellow, and blue sketch pens.
You have finally succeeded in making your healthy and fresh turnips in the painting!
You can now decorate this artwork in your kitchen or add it to your painting collection! This can also be the classroom activity on ‘healthy vegetables’. You can also add some of your favorite vegetables to it and make it a healthy craft for your appetite and brain too! This painting will definitely manipulate your kiddos to eat up all the veggies on their plates while enjoying them! What are you waiting for? If not made et make it now!
Share the results of your painting and tell us your feedback in the comments section below! Also, give this article a like and share it with your friends!
You May Also Like
- Peacock Stamp Painting With Hacks Tutorial
- Cabbage Stamp Roses Painting Tutorial
- Cherry Flowers In Pot Painting Step by Step Tutorial
- Bubble Wrap Pomegranates Craft Tutorial For Beginners
- Paint Spill Shrub Plant Painting Tutorial


